IT Technical Support for Developers
Windows
0x00000040, How to Fix Win 11 Printer Sharing to win 10 /win 7
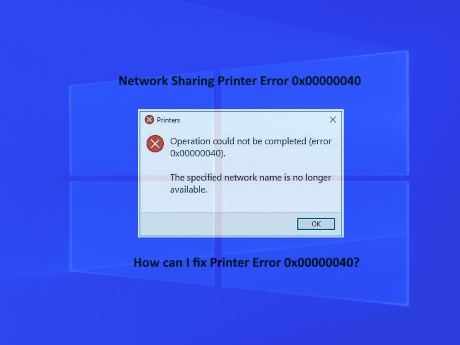
Operation Could Not Be Completed Error 0x00000040 The Specified Network Name Is No Longer Available
How can I fix Printer Error 0x00000040?Windows 11 Network Printer Sharing to Windows 10 / Windows 8 / Windows 7
It’s a common error that users face if a third-party printer driver is installed on the print server. Fortunately, you can fix this by following some simple steps.
Printer Error 0x00000040 can be fixed by following some simple steps.
Printer Error 0x00000040 can be fixed by following some simple steps.
What causes Operation could not be completed (error 0x00000040)?
Windows 10/11 doesn’t allow users to install a third-party printer driver on the print server. You need to change the Group Policy settings or tweak the Registry to resolve the issue. The other reasons for this error could be:
1.Point and Print Restrictions policy
2.Pending print jobs in Print Spooler
3.Printer Driver issues.
Run Printer Troubleshooter
1. Press Windows Key + I to open Settings.
2. Scroll down and select Troubleshoot > Other Troubleshooters.
3. Click on Run beside Printer.
4. Once the process is complete, restart your device to see if the printer error has been resolved.
1. Press Windows Key + I to open Settings.
2. Scroll down and select Troubleshoot > Other Troubleshooters.
3. Click on Run beside Printer.
4. Once the process is complete, restart your device to see if the printer error has been resolved.
Modify Group Policy Settings
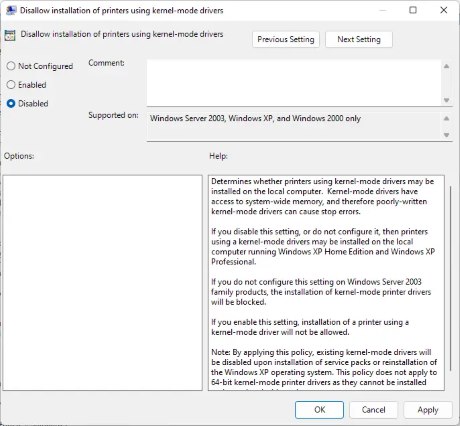 Kernel-mode drivers operate in kernel mode and have unlimited access to hardware and memory. But sometimes, the kernel-mode driver’s policy can malfunction due to corrupted drivers. Disable the policy and check if the error is fixed.
Kernel-mode drivers operate in kernel mode and have unlimited access to hardware and memory. But sometimes, the kernel-mode driver’s policy can malfunction due to corrupted drivers. Disable the policy and check if the error is fixed.
Disable the Point and Print using Registry Editor
1. Press the Windows key + R to open the Run dialog box.
2. Type regedit and hit Enter.
3. Navigate to the following path :HKEY_CURRENT_USER\Software\Policies\Microsoft\Windows NT\Printers\PointAndPrint
4. right-click on InForest and select Modify.
5. Now enter the Value data as 0 and click Ok to save the changes.
6. In the same way, change the value data of Restricted and TrustedServers to 0.
7. Close the Registry Editor and restart your computer.
Update Printer driver
Update your Printer driver and see. Keeping your drivers up-to-date is very important. Although Optional Updates do update some of the drivers, some require you to download the driver manually from the manufacturer’s website.
Update your Printer driver and see. Keeping your drivers up-to-date is very important. Although Optional Updates do update some of the drivers, some require you to download the driver manually from the manufacturer’s website.
Windows 10 printer sharing error 0x0000011b FIX
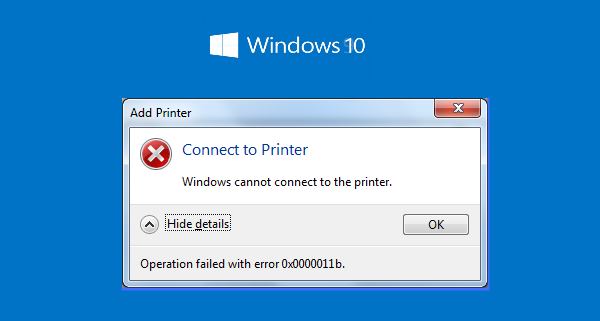
How to Fix Windows Cannot Connect to Printer
Windows Printer Sharing Error 0x0000011b Fix Printer Error 0x0000011b issue Accessing Shared PrinterMicrosoft Has fixed all the issue related to Printer Sharing
September 14, 2021—KB5005565 (OS Builds 19041.1237, 19042.1237, and 19043.1237)
Release Date: 9/14/2021
Version: OS Builds 19041.1237, 19042.1237, and 19043.1237
Windows 10 2004. 20H2 and 21H1KB2310138
Here is how to fix Printer Error 0x0000011b in Windows 10
Step 1:In Server PC: Check for TCP/IP => Inernet Protocol Version 4
Step 2: Configure Manual IP instead of Automatically IP Assign.
Step 3: Check with your Printer server Name, (Compurter or PC Name)
It should not have a long name or special characters or Numbers alone,
set relavent name for it.
Allow server machine to use filesharing with itself via the DNS Alias
Step 4: Check / Configure Network Sharing Rights for the printer (and Update Printer Driver).
Step 5: in Client PC using run command type "\\IP number of Printer Server"
Step 6: now you are able to view all the shared folders and printers,
double click on the printer icon to Install the printer driver in client PC.
Step 7: Still you are getting the same error, do followings
a. Create a new user with Administrative rights in "Server" Where you are conneted the Printer
b. Connect the "Server" with new user with password, in client where do you want to access the printer in sharring mode.
after this try the step 6.
How to Fix Boot Error code: 0xc000014c, Win10/8
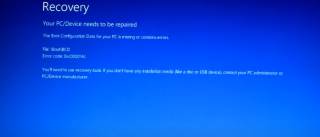
File:\Boot\BCD - Boot Configuration Data is Missing
The Boot Configuration Data for your PC is missing or Contains ErrorError Code : 0xc0000014c,0xc000000f
After the recovery of Win10, or Blue Screen Error, you get the above error and you can not boot the PC.
Window - choose -Repair your computer option rather than re-install.
Step is Select Troubleshoot , Advanced options, Startup Repair
Step is Select Troubleshoot , Advanced options, Startup Repair
if that does not fix the error try...
1. Boot with the windows 10 USB or DVD or external device
2. When you get to the [install now] screen do not select or install
3. Press the [shift] and [F10] buttons to get to a command line (dos black window)
4. In this DOS prompt window type the following commands and press enter after each command
bootrec /fixboot
bootrec /rebuildbcd
bootrec /scanos
exit
5. Remove the usb/dvd/any other boot device and reboot your computer.
Windows 11 How to install on unsupported hardware

Steps How to install Windows 11 on unsupported hardware
If you have a computer with unsupported hardware, you may still be able to upgrade to Windows 11
You can upgrade an incompatible computer to Windows 11 at your own risk, and here are two methods to complete the task.
Step 2: Download Windows 11 64 bit From Microsoft site
Step 3: Copy file “install.wim” from source folder Of windows 11 setup folder to source folder of windows 10 setup folder.
Step 4: Click Setup.Exe from windows 10 setup folder
Method 1 to upgrade Windows 11 on unsupported hardware
Step 1: Download Windows 10ISO 64 bit From Microsoft site.Step 2: Download Windows 11 64 bit From Microsoft site
Step 3: Copy file “install.wim” from source folder Of windows 11 setup folder to source folder of windows 10 setup folder.
Step 4: Click Setup.Exe from windows 10 setup folder
Method 2 to upgrade Windows 11 on unsupported hardware
Click on Start and type ‘regedit’ and press enter.Navigate to Computer\HKEY_LOCAL_MACHINE\SYSTEM\Setup\MoSetup
Under MoSetup,
right click on the right plane and then choos New ->DWORD (32-Bit) value
Enter following details and click Ok
Value name: AllowUpgradesWithUnsupportedTPMOrCPU
Value date: 1
Base: Hexadecimal
Once this is done, download the ISO file from the official Microsoft page,
open it in the File explorer and double-click on Setup to start the installation process.
Windows 10 printer error 0x00000709
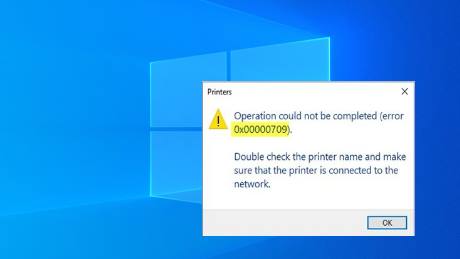
Printer Error 0x00000709 when you try to Connect, or Set as Default Printer
Many Windows users are reporting this 0x00000709 problem as well. it’s possible to fix it.
One of the most annoying issues with a Printer is the one where it refuses to get set up or configured on your computer. When it has configuration issues, one of the common errors that it throws is 0x00000709. This occurs if there is already a default printer set and configured or
Windows does not want to add or configure the new printer.
Fix for Printer Error 0x00000709
It will support - Win7 / Win8 / Windows10IMPORTANT: Modifying the registry in your computer could cause irrecoverable error if the modification is done incorrectly, therefore, it is very important for you to back up your registry first.
Step 1: Hit the WINKEY + R button combination to launch the Run utility, type in regedit and hit Enter.
Once Registry Editor opens, navigate to the following key location
Step 2: HKEY_CURRENT_USER\Software\Microsoft\Windows NT\CurrentVersion\Windows
Step 2: HKEY_CURRENT_USER\Software\Microsoft\Windows NT\CurrentVersion\Windows
Step 3: Now, under the Windows folder, double-click on the file named Device on the right-side pane.
Add the name of your printer inside the Value Data
Example Priner Name / Device Name
HP 1020
canon lbp 2900
.
.
.
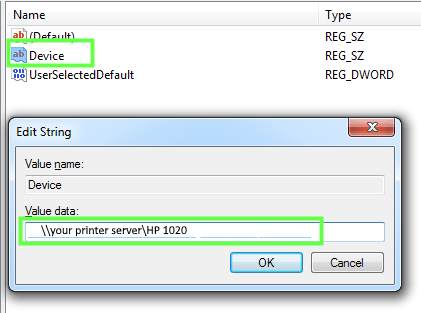
if the printer is not shared printer you just enter printer name alone
Example Priner Name / Device Name
HP 1020
canon lbp 2900
.
.
.
if the printer is not shared printer you just enter printer name alone
Step 4: Click OK to save the change.
Note: If you encounter this sort of error "Cannot edit Device: Error writing the value’s new contents", please follow the steps below to set the permission of the key.
Note: If you encounter this sort of error "Cannot edit Device: Error writing the value’s new contents", please follow the steps below to set the permission of the key.
Step 5: Right Click on the windows folder
refere the path :HKEY_CURRENT_USER\Software\Microsoft\WindowsNT\CurrentVersion\Windows.
Click "Permission" Option from the Popup Menu.
refere the path :HKEY_CURRENT_USER\Software\Microsoft\WindowsNT\CurrentVersion\Windows.
Click "Permission" Option from the Popup Menu.
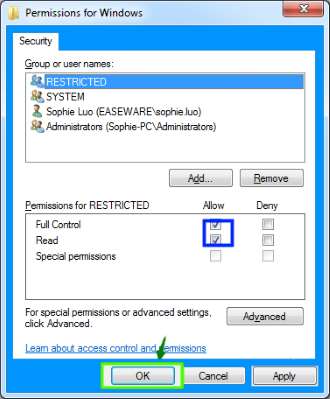
Step 6: Tick the box Allow for Full Control and Read,
then click Apply and click OK to save the change. reffer above Picture of "Permissions for Windows"
Step 7: Once you have done that, right-click on the file named as UserSelectedDefault and select Rename and then rename it to your printer’s name.
Step 8: Reboot your computer for the changes to take effect.
Step 8: Reboot your computer for the changes to take effect.
Step 9:After Rebooting you need to update your printer driver for it to work more smoothly
Note:- Once you have added the printer, remember to reverse the Permission changes you made. This is in the interest of security.
Printer Error 0x00000709 when you try to share a printer
Step 1 : Check with the printer server system in sharing mode Example : in run command type "\\Your Printer Server Name" if it works and you can able to see all the shared folders and printers then do the followingsenable your system network wins NEBIOS over TCP and try for printer sharing.
Step 2. In run command type "\\ IP number of the Printer Server" if it works and you can able to see all the shared folders and printers, then you can install all the shared printer in your system.
if you are not able to install a shared printer, all above steps are faild, and then do the followings
In server side
Step 1: Check for TCP/IP => Inernet Protocol Version 4
Step 2: Configure Manual IP instead of Automatically IP Assign.
Step 3: Check with your Printer server Name, (Compurter or PC Name)
It should not have a long name or special characters or Numbers alone
set relavent name for it.
Allowing server machine to use filesharing with itself via the DNS Alias
Step 4: Check / Configure Network Sharing Rights for the printer (and Update Printer Driver).
Step 5: in Client PC using run command type "\\IP number of Printer Server"
Step 6: now you are able to view all the shared folders and printers to Install.
All the best!
Related Links...
Windows 11 Upgrade from Windows 10 - A Free Upgrade
Win 11 an existing connection was forcibly closed (OS error 10054)
Windows 10 printer sharing error 0x0000011b
How to get Windows 11 without TPM 2.0
How to add 2-Step Verification in Gmail
How do I fix Windows Update 11 error?
Windows 11 error code 0x800f0950
How do I fix error 0xC1900101?
Upgrade from Windows 7 to Windows 10 for free
PHPMailer Enable 2FA Send Mail with 2 Step Authentication
Windows 11 How to Launch Task Manager
Latest Post

/Tally Integration Capabilities

/Artificial Intelligence AI

/Artificial Intelligence AI

/Artificial Intelligence AI

/Artificial Intelligence AI